Sunday, November 29, 2009

Missing My Precious

I'm a little bummed out.  I dropped my sewing machine off at the "spa" last Monday, picked it up yesterday, but my embroidery module is now on the fritz!  I had to leave it at the shop.  I guess I can get back to sewing, but it doesn't really help me out with the onesie I need to make...

Since I haven't been doing much crafting myself, here's some exciting news: one of my creations finally made it into an actual Etsy treasury! 


Fabric Bowl: Julian by SewBeans

The treasury will soon disappear, but here's a few of my favorite items from it:


Circle Pin Cushions by Lupin


Notepad Stocking Stuffers by paperbyforgetmeknot


Stocking Stuffer/Pencil Pouch by KaraMiaSofia

Thursday, November 26, 2009

Giving Thanks

Happy Thanksgiving!   


For each new morning with its light,
For rest and shelter of the night,
For health and food, for love and friends,
For everything Thy goodness sends.
~Ralph Waldo Emerson


With so many holidays and events to celebrate, I enjoy Thanksgiving the most.   Truly a holiday to be spent with those most dear, we cherish one another and the country as a whole, as we all enjoy a ubiquitous meal of turkey, potatoes, stuffing and gravy.  

This year was especially difficult in my family;  the economy took its toll on us.  As a result, I think we've been able to spend more time together, and for that, I'm thankful.  With December around the corner, I'm really looking forward to 2010.  I have a positive outlook for next year, and for once in my life, I've started to get excited about my work, and for that, I'm thankful.  Most importantly, although my immediate family is not celebrating this holiday at my house, we're all celebrating somewhere and raising a glass to having a roof over our heads, clothing on our backs, and each other.  And for that, I'm truly thankful.

Wednesday, November 25, 2009

A Storybook Ending with Rumpled Quilt Skins

As a creature of habit, I travel familiar roads.  And so, as one of the many things I've done this busy week, I made my way back to Pennington Quilt Works!  Enduring the traverse through New Jersey proved well worth it for a little bit of pre-Black Friday shopping!


I just love this shop!  Surrounded by a great selection ranging from modern to batik to reproduction, you'll find PQW's shelves stocked with fresh fabrics, not stuff you know has been hanging around for years...and years...  Even the "bargain bin" is filled with good picks!

After probaby an hour's worth of debating and considering between what I could afford and what I could manage to make before Christmas, I chose a few items. I did some Christmas shopping, but I also picked up something fun for me!  (to make eventually...)  They're truly adorable, quilted stuffed animals called Rumpled Quilt Skins by Kathy Barbaro.  (She's on Etsy!!)  Made with batiks, these have a charm that you don't find in an everyday child's toy.  I only purchased the giraffe, but I can't wait to add to my collection!


If you decide you've got to have these too, the sales associate informed me that their pattern maker recommends adding an extra 1/8th yard to the fabric requirements.  Better to be safe than sorry! 

*   *   *   *   *   *   *   *   *   *   *   *   *   *   *   *   *   *   *   *   *   *   *   *
A little side note, I stopped at a small Italian restaurant just south of the quilt store for lunch, on the opposide side of Royute 31 from the shop...don't go there.  Among other restaurant faux pas, I was served the exact same salad before my panini as was served beside my panini...weird.

Monday, November 23, 2009

Happy Turkey Week!

It's going to be a busy week, but I'm handling it, for now.  Mom and I are off to a couple quilt stores today.  Then she's leaving tomorrow and friends are coming Wednesday for Thanksgiving!  On top of it all, I'm currently juggling four jobs...I think my favorite blog might fall off the radar...  See you all soon, I hope!

Sunday, November 22, 2009

Musical Wines

I love being "in theme."  So while I shopped for musically inspired wines on Friday, I was excited to happen upon a Wolfgang Gru-Vee from Austria!  I also purchased a bottle of Red Guitar's Navarra to continue with my "Musical Wine" theme.  I will be playing in my local concert band's Fall Concert today and am looking forward to hosting an after concert wine and cheese party with my friends and family!


In Pennsylvania, we have to purchase all our wine and liquor at one store, and they often don't have an extensive collection of wines.  I searched the store for musical inspired wine labels and names, and only came up with two.  I'm curious to know if anyone else knows of some musical wines??  Or maybe you've sampled a bottle of Red Guitar or Wolfgang?  

...I better go, it will be time to start warming up soon enough!

Friday, November 20, 2009

Warmed up like biscuits! Cheddar Biscuits!


Third time's a charm, because I finally got perfectly round biscuits!  Just look at it!  Don't you want to reach into your screen and take that yummy, cheddary, flaky goodness?  That's right, they were flaky!  I'm so proud.

When attempting this recipe before, I would have to revert to drop biscuits when left with a sticky, blobby, yet still delicious biscuit batter.  This time, instead of pulling out the mixer, I learned how to correctly combine everything together with my hands.  I made scones recently that specified cutting in the butter with two knives, and I realized I needed to try that with this biscuit recipe!  Certainly a labor of love cutting in butter, I alternated between knives and my fingers, and it did the trick.  They happily cut into perfectly round biscuits.

Cheddar Cheese Biscuits

2        cups all purpose flour
1        tablespoon of sugar
2 1/2  teaspoons of baking powder
1/2     teaspoon of baking soda
1/2     teaspoon of salt
6        tablespoons of chilled, unsalted butter, cut into small pieces
1 1/4 cups of cheddar cheese
1       cup cold buttermilk (I use the instant powder)
1       egg beaten with 1 tablespoon of milk (glaze)

1. Preheat over to 400°.  Combine dry ingredients in a large bowl.  Add butter and cut in, using a couple knives, a dough cutter, or even your fingers until a fine meal forms.  Add cheese and mix until combined.

2.  Add buttermilk (or water if you added powdered buttermilk in with dry ingredients) and gently mix together to bind dough.  Turn onto a well floured surface and knead about 10 turns until combined.

3. Pat out dough to 3/4" thickness, and using a biscuit cutter or glass, cut out biscuits.  Gather scraps, gently knead together and repeat to make additional biscuits.

4. Transfer biscuits to parchment lined or Silpat lined cookie sheet.  Brush biscuits with egg glaze and bake until golden brown and firm to touch, about 18 minutes.  Serve warm!


I think I'm becoming a better baker!  But practice makes perfect...and more biscuits to eat!  Here's a couple of things this baker has added to her Christmas wish list for the next time I make this recipe:

a Pastry Blender


Thursday, November 19, 2009

Getting Over the Camera Strap Cover Craze


Woot!  Woot!  I just mailed out two camera strap covers, and there's now only two left in my shop!  They've been on clearance quite some time now, as I'm happy to report that I'm phasing them out of my shop.  What helped begin my small business career may soon be sold out (fingers crossed!!)... or extinct.

I began my Esty shop with bookmarks and camera strap covers.  I still love to make the bookmarks, but  it took me most of yesterday evening to make just one camera strap cover.   They're simple to make, and unfortunately, have virtually no creative input after choosing the fabrics.  So "ADD Jill," as my husband so affectionately calls me, kicks in.  I probably wasted two hours instead of twenty minutes.  However, the camera strap covers have become a very important part of the history of SewBeans.

Starting something new is always difficult, but especially when it's as personal as your own business!  It is very exciting at first, but once you dive in, you realize how much time a business, even a small one, takes.  A lot of time, energy, decisions and money went into starting my shop.   What I wanted to make, who I wanted to sell to, how to price, how to photography my items, how to describe my items, how to re-photograph my items, what I wanted my avatar to be....  There was quite a learning curve, and the camera strap covers suffered through it.  I had to start exploring my business with something...I'm so excited to be moving on!

It's my choice not to make camera strap covers anymore;  I want to keep moving forward, soul searching and reinventing myself.  One thing I have realized, is that I don't want a camera strap cover shop.  But if it weren't for those camera strap covers, I might not even have a shop!

Wednesday, November 18, 2009

Things in the Mail

I get a lot of junk in the mail.  Mostly catalogs from places I've never ordered, followed by yet another ad for Comcast.  And no, I don't consider that "comcastic."  I try to do my part and recycle most of what comes in the mail, though every so often, I actually get something I want to keep.  Either a purchase from Etsy (hoorah!), or one of my many magazine subscriptions!

I've subscribed to plenty of magazines in my life, but recently due not only to financial reasons, but also because it's been difficult finding the time to read them all, I've widdled down my list and chosen only to subscribe to magazines that truly inspire me.  So without further ado, here's the list of magazines that have entered my mailbox this month:

1.  This Old House


 This might be my favorite magazine to find in my mailbox.  To me, this is real architecture.  I used to scour through old issues at my in-law's house while they sat and chatting around me...I decided I should be a little more polite and just recieve TOH at home.

2.  Martha Stewart Living


After all my posts about her, are we surprised?  The designers at Living get two-thumbs up from me.  I love this magazine's layout, and although I've probably never tried any of the crafts, the colors and images are always so inspirational that they truly get me in the mood for whatever's festive that month.

3.  Everyday Food


 Not more Martha!  Yes...  A recent addition to my collection, I've started cooking a lot more at home and thought a monthly cooking magazine would be a great inspiration.  Last night, I tried the December issue's recipe for Chicken and Chickpea Soup...it got rave reviews in my house!

4. Better Homes and Gardens


This is what I read instead of People for the latest gossip...well, I at least consider it my equivalent.  It's cheap to subscribe to, filled with easy to read articles, and has enough decent home and garden designs and ideas to keep me subscribing.  I usually read it in an evening, then leave it laying around, thinking that I might try out one or two of the recipes.  I should probably go find those and dust them off now...

5.  Bottom Line/Personal


 Somewhat kitschy, this is actually a bi-monthly newsletter filled with little tid-bits and tips from health, to finance, to common sense.  It's usually a quick read, and my husband and I always find many interesting to discuss from the latest issue. 

 6.  American Patchwork & Quilting


 A better Homes and Gardens family member, this magazine usually is a gift subscription from my mom.  Always great for color inspiration, I maybe once a year actually make one of the quilts and really just love it for reading up on the latest notions and books.  Another favorite is their news stand only Shop Hop edition, that makes me want to jump in my car and travel the country to all the "best" shops.  

7-ish.  Real Simple


This one was a gift subscription that just ended, and I'm including it, because I just got my last one in the mail.  I debated renewing, but this one fell to the axe when I realized my favorite part of it was not the articles, but the clever section dividers in the magazine that appear to be scenes totally made out of paper...not exactly worth the subscription price.

8-ish.  Quilter's Home Magazine


 A guilty pleasure, this one is also an "ish" because I don't subscribe to it, but usually purchase it in the store when I see it.  If it's not silly enough that I don't subscribe to one of my favorites, this is probably the only magazine I read from cover to cover.  The wittiest quilting magazine you'll ever find, there's something to be said about a craft magazine that always includes a recipe for a new cocktail!

Tuesday, November 17, 2009

Fun with Shards of Glass


Last night, I entered a room I never thought I would lay eyes on again...the high school chemistry classroom!  However, this time, I was not afraid of being surrounded by the night before's chemistry homework that I refused to do.  (Looking back, I'm proud of myself for never actually doing my homework and copying the answers off the board the next day.  Sure I didn't learn chemistry (not a missed opportunity), but how else would I have the accomplishment of seeing every episode of Saved By the Bell if I had actually spent that time doing homework?)  I freely entered the high school chemistry classroom to attend a fused glass class provided by my local community education program!


I never took any art classes in grade school (I was and still am a band geek,) but I'm certainly making up for it now!   I signed up for the fused glass class only because it sounded like fun, and glass is not a medium I've had an opportunity to dabble in yet.  I went into the class having not a clue what "fused glass" entailed, but after a quick 5 minute explanation, I was off to create two fused glass ornaments.

I was given two clear, about 2.5" diameter glass circles that would be the bases for my glass ornaments.  Then, with the choices of a whole spectrum of colored glass, glass stringers, and glass frit, I was left to compose designs and glue them into place with small dabs of white craft glue.   Armed with a  loaner glass scoring tool and pliers for breaking on the score, I found that breaking glass on a small scale was actually a little difficult...

I think the next glass class I take (in three weeks!), I'll do a little research, so I at least have a clue of what I want to design.  After much contemplation and a couple hours, I finished my two little ornaments.  The instructor now has them and is taking them to add another piece of glass to the bottom and a wire hook for hanging, then fusing them in a kiln.

Of course, I'm excited about picking them up in two weeks and can't wait to share the finished pieces!  Here's a sneak peak at one of my ornaments:


Okay, something actually sewing related:  I just saw this in an email, and it couldn't go un-noted!  This monkey pattern is too cute!

Monday, November 16, 2009

Chef Jack's Little Apron

Wrapping paper coffee, anyone? 


I didn't think so.  As a preventative measure, just don't let a two-year-old, juiced up on Christmas presents make the coffee!  But do encourage them to be help out, supervised, of course!

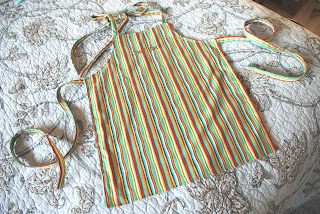
Last year, at my sister's request,  I stitched together a two-year-old sized apron for my nephew as a Christmas present.  A super, inexpensive gift idea for a crafty sister!  It's cute and adorable, and he still uses it while helping out  in the kitchen!

At the request, I googled away and found a great free apron pattern online.  (I was still able to find the pattern a year later, and you might even be interested in checking out MB's witty, supafine blog!)  All I purchased to make the apron was one yard of fabric, and I think I still have enough leftover to make a second!


This apron definitely goes in the file as a simple sewing project, and it went together almost too easy to have become such a quality Christmas gift.  Though, never happy with completely following a pattern, I made two apron strings at the top, and two at the sides.  This allows for the apron to be tied with a bow around the neck and the waist for complete adjustment to height and girth.  I also embroidered in the adorable words "Chef Jack" to personalize it for my nephew.  That way, little brother won't try to borrow it.  Another tip, make sure the strings are secure from little tugging hands with some extra stitching.


Don't tell, but I think the next nephew is due for one this Christmas...

Sunday, November 15, 2009

Bird Brained


I'm off to a baby shower this afternoon, but before I drop off the gift, here's a peak at the packaging!  My friend decked out her nursery with birds...so I had to follow suite! 

I found a crafty pom-pom bird kit while bargain hunting containing four birds that were so simple to put together.  The kit even came with a little bottle of glue, and it was as easy as gluing the eyes and pre-cut beaks to a small pom-pom, then gluing that to a larger pom-pom, adding on the pre-cut tail and twisting together some little pipe cleaner feet.  It would have been a simple project without the kit!

I adorned some faux dogwood branches with the birds, then stuck them in a gift bag, that also matches the nursery's colors!  I hope she loves it!


Saturday, November 14, 2009

Lions and Tigers and Applique! Oh my!

It's Saturday, so I'm devoting my time to conquer something big!  No, the bathrooms can wait till tomorrow...  I've finally started my first real applique project.  You know, the kind where you use freezer paper and actually turn the edges under.

This quilt project with "easy applique" began nice and strong a couple weeks ago.  With determination I cut all the blocks out, made my applique templates, ironed on the freezer paper and cut out all my shapes.  Then, I proceeded to prepare the circles first. 


Surprisingly easy and fun, I finished half of my circles in one night while watching tv!  I used pre-cut cardstock circles, pinned them onto the fabric and cut a generous 1/4" seam.  With a needle and thread, I sewed small stiches around the edges, then gathered the thread taut to my circles.  A little bit of spray starch and a hot iron and these circles are looking great!

Now, on to the rest of the shapes!  I sprayed starch into a small lid, then using a q-tip, I spread the starch along the edges of the fabric peaking out from under my freezer paper template.  With my regular, big iron, I proceeded to fold over the edges of the fabric onto the freezer paper.  Ugh!   The iron was so clumsy, I kept pressing open the edges I had just pressed closed.  Frustrated, I put the project aside for a little bit...


Unfortunately disgusted by the thought of applique, I still needed to get back into this quilt!  Well, who said money can't buy happiness?  I've always had my eye on those cute little irons in the quilt and craft stores, and it occurred to me that this is what my notion collection was missing!  So this morning, I heated my new little Clover mini iron for the first time.  Wow!  The little edges continually folded over.  An immense improvement, I now have a positive outlook on applique, but I think I will still need some practice. 

So while I'm hacking through the rest of my pile of ironing today, please, if you have any applique tips or tricks for me, I can still use them!


Can you figure out what I'm making?? 

Friday, November 13, 2009

Another Happy Friday!

I give up; I can't find my fabric scissors.  Hysterical, right?  No, but I'll surely be hysterical if I can't find the corkscrew!  Now that I think about it, my blog was trying to tell me something.  It's five o'clock on Friday, which means it's time to put the scissors down (for now) and partake in my favorite Friday evening festivities: wine, pizza and a good movie!  

While I've got you here, I figure I'll share an intriguing tea infuser I found online today:


Made by Trudeau, this silicone tea infuser comes in three different colors and has a bendable "stem" that wraps over the edge of your teacup.  A beautiful design, I'm curious to know how well it infuses...

Off to get the pizza out of the oven!

Thursday, November 12, 2009

Who needs God when you've got Etsy Karma!


A couple months ago, I attended my first wreath making class.  My friend, a talented and veteran wreath maker, taught the "class" to me and another friend in her basement.  I'd never made a wreath before, but there was only a small learning curve.  We scoured Michaels and AC Moore for grape vine wreaths and fall decor.   When we got to the basement, we attached our finds to the wreath with floral wire.  Simple!   I've been dying to try another one, or two, ever since.  With all my other unfinished projects brushed aside, I was actually hoping to purchase supplies, take some pictures, and post the process to my blog!

Well, last night while "wasting time" on the Etsy Forums, I happened on a post where someone was complaining about their low Etsy sales.  I commiserated.  I've been there...and I've even authored similar posts.  In the forum thread, there were fellow Etsy sellers with great shops and no sales for months!  So I struck! For a mere $9 with shipping, I bought a sweet little knit pumpkin, and I smiled as I thought of that seller frantically circling around their room trying to comprehend their first sale.

I was so proud of my "good deed," I told my husband when he got home.  He wasn't so proud.  All he could see were dollar signs flying faster then the speed of light out the door, and am I actually making money on my Etsy sales??  (Well, not exactly...)

So today, I won't be going out and purchasing supplies for my wreaths.  (I don't want my sweet husband to put me on a budget.)  While trying to decide what to do instead today, I checked my email this morning and couldn't believe my own eyes.  Last night, while I lay snuggled in bed, an item was purchased from my Etsy shop!  Yes Virginia, there is a Santa Claus.  And yes, I do believe in Etsy Karma!


So here's my thought:  I would still like to make two wreaths to go on top of my bookshelves, but the back of my living room could sure use more help than that.  What if I did a blog competition?   Anyone interested in contributing their interior design two cents if I set this up?

Wednesday, November 11, 2009

Give the Gift They Don't Want to Open


The Second Baby Boom in full force!  No, seriously, it is.  I personally know of someone pregnant in every month from here until May, which is probably why I'm more stressed out about baby gifts than I am Christmas gifts!  On top of all that, I don't like going to baby showers...mostly because I can't stand to be in a room with that much estrogen.  So I tend to hide, and I've learned to give my gifts all the attention.  I craft together gifts that are too cute to be opened!

I enjoy making baby gifts.  They're small, which means the projects usually go together fast, and their themes are cute, sweet and colorful.  (In busy times like these, I do find solace in purchasing those ever so important baby needs off the registry.) But often, I've had so much fun making the gift, I rarely stop there!  I then insist on wrapping the gift with just as much creativity as I can muster. 


For my sister-in-law's first child, I went nuts.  I created an adorable stuffed octopus, and wrapped a custom embroidered onesie into each of its arms.  The octopus sat on a wrapped gift from her registry, and I placed the card (with her name embroidered on a ribbon that was sewn onto the envelope) in the perfect spot so that its face was still a surprise. Clear cellophane bound the whole thing together and colorful ribbons were tied tightly to the top.  It was so darn cute I didn't even want to give it to her; I just wanted to keep it for myself!

So now you can seem my demise, as I glue together pom-pom birds to adorn a gift I'm giving this weekend.  Maybe I should take the time to actually finish the gift...

With all this gift giving, I hope you can be inspired not to just throw your beautifully crafted projects into a gift bag.  Whether it's for a baby shower or Christmas, everyone  in the room should assuredly know that you are the craftiest!


Here's a picture of me with that cute octopus!  "Hexapus" was another creation inspired by Plush-o-rama.

Tuesday, November 10, 2009

Good Coffee, Bad Coffee

Beware:  This is a biased, un-blind taste test. 

I've muscled though this canister of the bad coffee too long to sit in silence.  If I had to describe both the flavor and aroma in one word, it would be "blah."  Unless, I'm smelling the cinnamon, cloves and cardamom that I've infused into the latest carafe.  Then my word might be: "manageable."

It's not that I'm a coffee snob; it's just that I like my coffee.   At Wa-wa I go straight for the "regular."  However, back to being a snob, the basis for comparison in my household is Starbuck's Whole Bean Breakfast Blend.  It was the staple...until I realized I could buy a large can of Maxwell House or Folgers for the same price as a small bag of Starbucks.  As they both sport a label boasting a nice, mild breakfast blend, I decided it was worth giving them a try.  (Immediately, whole bean flies out the window.  Isn't that novel?  No dirty grinder to clean up!)

So here it is:  Maxwell House Breakfast Blend vs. Folgers Breakfast Blend


Maxwell House was on sale first, and therefor, first up to bat.  From my recollection, the Maxwell House Breakfast Blend tasted just like the Starbucks.  (A home run, right?)  One whiff of that sweet aroma and I'm standing at the ready, cup in hand.  Then the first sip, and I've conveniently forgotten being snuggled up in bed, pinned between two cats a mere fifteen minutes ago.  Oooo, the "flavor lock" lid snaps right back into place!

Okay, I think you've caught on to my biased, un-blind taste test.  Refer to the top of this post, and infer how the second half of this taste test proceeded.  Let's just call Maxwell House Breakfast Blend the good coffee, pour a second cup and get on with the rest of the morning...my sewing machine awaits!

Monday, November 9, 2009

PB&J Cookies


Start your week off right by spoiling your friends, family and yourself with peanut butter and jelly cookies!  And make sure you've got enough ingredients to make two batches; the first probably won't make it to tomorrow!

PB&J Cookies
yield: 46 cookies

3/4      cup natural smooth peanut butter, mixed well
4         ounces of unsalted butter, softened
1/3+    cup of granulated sugar
1/3      cup of packed light brown sugar
1         large egg
1         teaspoon of vanilla extract
1         cup of all-purpose flour
1/2      teaspoon of baking powder
1/2      teaspoon of baking soda
1/2      teaspoon of salt
           seedless raspberry jam

1.  In a mixer, combine peanut butter and butter until smooth.  Preheat oven to 350°.
2.  Add sugars.  Mix until uniform and fuffy, then fold in egg and vanilla.  Mixer on low, add flour, powder, soda and salt until well combined.
3.  Rolling with your hands, form even balls of dough into 1" diameters.  Coat each ball with granulated sugar, then place on a cookie sheet (I always line mine with parchment first) with about a 2" spacing.  (These cookies don't spread very far.)
4.  Bake cookies for 10 minutes until they've puffed up.  Remove from oven.  Using a 1/4" teaspoon, press a small well in the middle of each cookie.  Spoon a rounded 1/4" teaspoon of jam into each cookie, then return to the oven.  Bake for an additional 6 minutes or until golden in color.
5.  Transfer to wire racks and try your best to wait to sample a cookie once they've cooled.

Sunday, November 8, 2009

Sugarloafs and Sugar Loafs

Another jam-packed weekend has left me gasping for air, and it's only Sunday morning! Piles of laundry and dust bunnies in the corners continue to grow substantially. (...I thought I'd get to those by last Thursday.) Another cough and moan echoes from around the corner, but I'm without a care.  A cranberry walnut muffin in hand and coffee at my side, I'm preparing for another busy day!  But enough about today, this post is about yesterday's Sugarloaf and sugar loafs! 

First, Sugarloaf.  After a busy morning preparing some packages for the mail, my girlfriend and I headed out to Oaks, PA to the Sugarloaf Craft Festival.  We purused the aisles of hundreds of fellow crafts, and to keep from total exhaustion, we only entered when something caught our eyes.  We had a great time, and I was so busy anxiously peaking around the corners and to the next booth, that I forgot to take any pictures!  So in retrospect, here are the items that I deemed worthy enough to be purchased!


The first item I purchase was a bottle of Berkshire Sweet Gold Pure Maple Syrup.  For some unknown reason, I was absolutely smitten when I stumbled across this booth.   Truly "pure gold," I sampled four unique flavors of syrup and finally settled on a bottle of the "light."  I can't wait to try it in recipes or as a simple syrup in my next mojito!


I found that I tended to be drawn towards the items I can't make myself,  (and the little fleece penguin hats for my nephews were very tempting!)  so my next find was a small pewter ornament of the Cape Hatteras Light from the House of Morgan Pewter.  Beautiful pewter pendants and ornaments sparkled throughout this booth.  It was probably the fact that these are made in North Carolina that I finally decided on the indigenous light house...or maybe it was because I couldn't stand there all day deciding!


 Finally, I picked up a tin of Ducky Life Tea.  I am not surprised to recall that my favorite aisles in the Craft Festival were the ones with booth after booth of outstretched arms donning food samples!  Since I'm on a recent green tea kick, this tin of Doreen's Green Classical Chai smelled too good to pass up.

And now for sugar loafs!  After the Sugarloaf Festival, I talked my ailing husband into going to the new Wegman's Market in Collegeville.  A crafter's got to eat!  Let me just say, he thanked me afterwards for taking him there!  If you've never been to a Wegman's make a special trip to go.  Along the lines of Ukrop's, Trader Joes or Stew Leonards, Wegman's is the mecca of all things wonderful that can be shoved into one supermarket.  Enter my sugar loaf: a cranberry walnut muffin!  We also purchased some sushi, that didn't make it home, and some turkey bean chili and sourdough bread for dinner.  We finished the day snuggled up with our chili watching Superman.  (Can you believed I'd never seen it?)

Now that my coffee is empty, I've got to be off and running again. Do me a favor, and call so I can at least move the laundry out of the way before you stop by!

Friday, November 6, 2009

Hoopla: Tips before you hang up that home embroidery hoop!

Nests of thread? Holes in garments? Off-kilter designs?
I've sweat; I've cried; I've thrown my hoop across the room. Nothing is more frustrating than ruining an embroidery project within the first few stitches.  Which goes without saying, that the best way to get that project finished is starting it, correctly.


Once I calm down from my mistake, I vow to "never do that again."  Truthfully, I probably did do it again, but once I realized exactly what I was doing wrong, I found I completed more and more projects successfully.  These tips may seem obvious, but if I don't intentionally think through them, I'll end up with disaster. Here's my perfectly prescribed method to successfully starting a  home embroidery project.  (I've just jinxed my next project, right?)

First, take in a deep, relaxing breath, then follow my tips and tricks:


1.  Start off on the right foot, and with the right foot!  Take extra care in setting up your machine and embroidery module.  I've learned to take deep breaths in between every step to assure myself I'm not rushing through anything.  (Haste makes waste!)  Make sure you follow the manufacturer's specifications "to the t."  I've given my machine plenty of room, made sure everything is tight and secure, and wound my bobbin with matching thread for embroidering letters.


2.  Always use a new needle.  Or at least one that's been barely used.  It needs to be sharp, so it can slide through the layers of fabric and stabilizer neatly.  I also always re-thread my machine directly into my needle.  I am very easily distracted; if I threaded my machine, or half-threaded it (gasp!) then came back to thread my needle later, it usually got cross with me.


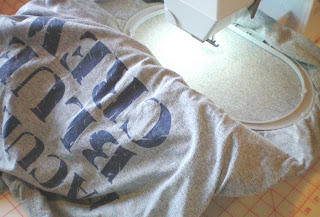
3.  Always stitch out your design on scrap material first.  An old high school t-shirt work great for this! Sometimes the belt in my embroidery module would get a little loose, so stitching the design out first (often not the whole thing)  assures me that the machine is working correctly and the design is grade A.


4.  Perfect placement the first time.  Whether I'm embroidering a t-shirt or a onesie, I pull out my ruler and my air-erasing fabric marking pen.  Line up the ruler directly below the armpits of the shirt and mark with a small dot at the center of the garment and then a couple more a inches away in each direction to make a straight line.  Hooping is one of my least favorite things, but this always guarantees me a straight design and perfect placement.


5. Make sure you hoop is secure, take another deep breath, and start stitching.  One final cliché, slow and steady wins the race.  (Sometimes, I actually will set up my machine to stitch smaller more delicate designs a little more slowly.)

Once I've started the project perfectly, I find there's little that can mess up my design now.  I was told I could go do the dishes while my machine embroidered away, but I never wander far!  You never know when something might get caught or you run out of thread!


I followed my routine and with great success!  Another completed embroidery project and no temper tantrums or wasted materials!   Now if I can only find my rotary cutter so I can get back to some of those other projects...